Monday, July 18, 2011

TIPS MEMBELI KAMERA DIGITAL

Jangka hayat bateri/sel
Ini adalah faktor utama yang anda mesti dilihat dalam memilih kamera digital. Saya dapati harga kamera dan jangka hayat sel tidak seiring. Banyak kamera yang berharga rendah mempunyai jangka hayat sel yang lama dan sesetengah kamera yang canggih dan ‘high-end’ mempunyai jangka hayat sel yang pendek. Contohnya skrin panel yang besar biasanya akan memggunakan kuasa yang lebih untuk beroperasi. Pertimbangkan samada anda perlukan kamera yang mempunyai jangka hayat sel yang panjang atau pendek.
Megapixel
Megapixel pada kamera digital menentukan berapa halus dan ‘detail’ gambar anda boleh dirakam dalam sesuatu shot. Biasanya jumlah megapixel ialah dari 4 megapixel hingga 16 megapixel. Bagaimana untuk mengetahui berapa banyak megapixel yang anda perlukan? Sebagai panduan, jika anda menggunakan gambar untuk dihantar melalui email atau post ke laman web, anda tidak memerlukan lebih dari 2 megapixel. Tetapi jika anda ingin mencetak gambar anda dalam siaz yang besar, seharusnya anda memerlukan 5 megapixel dan lebih. (Bergantung pada saiz gambar yang anda ingin cetak).
Lensa Zoom
Anda semestinya memerlukan kamera yang mempunyai ‘optical zoom’. Optical zoom menggerakkan lensa kamera untuk merakamkan imej pada jarak jauh atau dekat pada satu titik. Penggunaan digital zoom adalah secara digital membesarkan imej menggunakan mikrocip kamera- menghasilkan kualiti gambar yang rendah. Pengeluar kamera menekankan lebih kepada digital zoom daripada optikal zoom dalam iklan mereka; jadi berhati- hatilah semasa memilih!
Kawalan dedahan cahaya (Exposure Control)
Kebolehan mengawal ‘exposure’ seperti shutter speed (kelajuan shutter) dan bukaan lensa adalah perkara utama yang diperlukan oleh jurugambar yang inginkan kawalan secara manual. Kamera digital yang murah hanya membolehkan anda mengambil gambar pada mode auto- tekan shutter release…dah dapat tangkap gambar! Pengguna yang lebih ‘advanced’ lebih suka melaras kelajuan shutter dan aperture untuk merakam subjek mengikut kehendak mereka. Jika anda betul- betul minat dalam fotografi, pilihlah kamera yang mempunyai kawalan exposure secara manual.
Kawalan Pengguna (User Controls)
Jika anda mencari kamera jenis ‘point-and-shoot’ (p&s), pastikan anda mencari kamera yang mudah digunakan. Kawalan pengguna (user control) biasanya untuk menetapkan resolusi, macro mode atau flash dengan cara yang mudah dikawal. Adalah penting kita mencuba dahulu kamera yang ingin dibeli – cuba dengan butang-butang kawalan pada kamera dan cuba serasikan dengan anda. Dengan cara ini anda akan dapat memilih kamera yang lebih sesuai dan selesa dengan anda.

source : fototeacher

P/S : dah lama tak berjalan-jalan di sini =)

Friday, April 8, 2011

D3100 FEATURES [BEAUTIFUL]

DX-format, 14.2 effective megapixel CMOS image sensor [NEW] - Softly defocused backgrounds that only a D-SLR can produce

EXPEED 2-Nikon's new image processing engine [NEW] - Faithful color reproduction and smooth, beautiful gradations

ISO sensitivity 100-3200 (expandable to ISO 12800 equivalent) - Great performance and less blur in dimly lit settings

Active D-Lighting - Beautiful balancing of light and shade

Picture Control - Customizing images before the shot
portrait - Natural, lovely skin tones
vivid - Increased color saturation
monochrome - Black and white images, including tints

Thursday, April 7, 2011

D3100 FEATURES [EASY OPERATION 2]

Scene Modes - Your short cut to expected results
portrait
Use for portraits with soft, natural-looking skin tones. If the subject is far from the background or a telephoto lens is used, background details will be softened to lend the composition a sense of depth.
landscape
Use for vivid landscape shots in daylight. The built-in flash and AF-assist illuminator turn off; use of a tripod is recommended to prevent blur when lighting is poor.
child
Use for snapshots of active children. Clothing and background details are vividly rendered, while skin tones remain soft and natural.
sports
Fast shutter speeds freeze motion for dynamic sports shots in which the main subject stands out clearly. The built-in flash and AF-assist illuminator turn off.
close up
Use for close-up shots of flowers, insects, and other small objects (a macro lens can be used to focus at very close ranges). Use of a tripod is recommended to prevent blur.
night portrait
Use for a natural balance between the main subject and the background in portraits taken under low light. Use of a tripod is recommended to prevent blur.

Scene Auto Selector - Letting D3100 decide the best mode to match the scene
* Except when using manual focus.
** Selected when the camera identifies situations with no corresponding Scene Mode, or for situations that can be shot in Auto or Auto (flash off).

Help function - One-touch access to in-camera assistance

Info display format - Choose the view that's right for you

source : nikon

D3100 FEATURES [EASY OPERATION 1]

Guide Mode - The sure way to obtain desired results
·Using Guide Mode
·Three ways to shoot

·18 Guide Mode shooting options
easy operation
auto
no flash
distant subjects
close-ups
・ Lens: AF-S DX NIKKOR 18-55mm f/3.5-5.6G VR ・ Image quality : NEF(RAW) ・ Exposure: [Close Up] mode, 1/60 second, f/8 ・ White balance: Auto ・ Sensitivity: ISO 100 ・ Picture Control: Standard
sleeping faces
・ Lens: AF-S DX NIKKOR 35mm f/1.8G ・ Image quality : NEF(RAW) ・ Exposure: [Kids] mode, 1/30 second, f/2.8 ・ White balance: Auto ・ Sensitivity: ISO 200 ・ Picture Control: Standard
moving subjects
・ Lens: AF-S DX NIKKOR 55-300mm f/4.5-5.6G ED VR ・ Image quality : NEF(RAW) ・ Exposure: [Sports] mode, 1/1250 second, f/5 ・ White balance: Auto ・ Sensitivity: ISO 100 ・ Picture Control: Standard
landscapes
・ Lens: AF-S DX NIKKOR 18-55mm f/3.5-5.6G VR ・ Image quality : NEF(RAW) ・ Exposure: [Landscape] mode, 1/500 second, f/11 ・ White balance: Auto ・ Sensitivity: ISO 250 ・ Picture Control: Standard
potraits
night potrait
・ Lens: AF-S DX NIKKOR 18-55mm f/3.5-5.6G VR ・ Image quality : NEF(RAW) ・ Exposure: [Night Portlait] mode, 1/40 second, f/4.2 ・ White balance: Auto ・ Sensitivity: ISO 800 ・ Picture Control: Portlait
advanced operation
soften backgrounds
・ Lens: AF-S DX NIKKOR 35mm f/1.8G ・ Image quality : NEF(RAW) ・ Exposure: [A] mode, 1/1600 second, f/2.2 ・ White balance: Auto ・ Sensitivity: ISO 400 ・ Picture Control: Portlait
bring more into focus
・ Lens: AF-S DX NIKKOR 18-55mm f/3.5-5.6G VR ・ Image quality : NEF(RAW) ・ Exposure: [A] mode, 1/60 second, f/14 ・ White balance: Auto ・ Sensitivity: ISO 400 ・ Picture Control: Standard/dd>
freeze motion (people)
freeze motion (vehicles)
show water flowing
・ Lens: AF-S DX NIKKOR 18-55mm f/3.5-5.6G VR ・ Image quality : NEF(RAW) ・ Exposure: [S] mode, 1/4 second, f/22 ・ White balance: Auto ・ Sensitivity: ISO 100 ・ Picture Control: Standard
use a timer/ quiet shutter
single frame
quiet shutter release
continuous
10-seconds self timer

source : nikon

TECHNICAL SPECIFICATIONS OF NIKON DIGITAL SLR CAMERAS

d7000
d3100
d3s
d300s
d5000
d3x
d90
d700

source : nikon

Friday, March 25, 2011

WHAT ISO IS BEST FOR MY PICTURES?

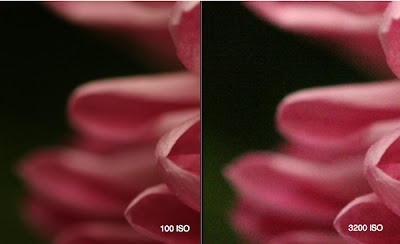
noise :
grainy look digital photos sometimes get, usually noticeable as multi colored speckles most visible in dark or shadow areas of image
- destroys detail in your image
- limit how much you can enlarge before the graininess becomes obtrusive
changing the ISO setting on your camera changes the sensitivity to light of the image sensor inside of it
- lower number that you select the less sensitive the sensor is to light
- higher the number the more sensitive it becomes
– when using a tripod you might be able to use a slower shutter speed which would allow you to lower your ISO
– if your subject is perfectly still (like when shooting a still life) and where you’re using a tripod you’ll be able to slow your shutter speed and lower ISO
– If you don’t need a large depth of field you might be able to increase your aperture which allows more light into the camera and will allow you to lower ISO
– using a flash or even switching on a light can help to get more light into your camera – allowing you to decrease your ISO setting
– sometimes a photo can actually look better with grain. Some photographers love the mood and atmosphere that a little noise can add and will bump up their ISO in the hope of getting it
– the reason that noise is not able to be seen on your camera’s LCD is that it is very small. As a result the pixels in the picture are small also and the grain is unable to be seen. It is only when you enlarge the picture on a larger screen or in printing that it becomes noticeable. If you’re only ever going to use the shot in a small size you can probably get away with a higher ISO

source : digital photography school

HOW DEPTH OF FIELD AFFECTS PHOTOS

1. distance between the camera & the subject
the closer your subject to you, the greater tendency for the objects in front & behind the subject to be blurry
3 meters away with a 28mm lens, everything is in focus
20cm away with 28mm lens, the depth of field is shallow

2. size of the lens opening (aperture/f-stop)
larger f-stops (smaller no.; e.g: f2/f4)produce less depth of field than smaller f-stops (larger no.; e.g: f11/f16)
f/1.4
f/5.6
f/16
recommend shooting in Aperture Priority mode
(you can choose the aperture and the camera does the rest for you and chooses the appropriate shutter speed)
(size of numbers are reversed because aperture are actually denominators of fractions)

3. magnification (focal length)
shorter the focal length of lens (e.g: 18mm/20mm) the  more depth of field present
(a wide angle lens and covers a big field of view)
allows to capture a whole landscape in a photo
as focal length grows longer (e.g: 70mm/100mm) depth of field shrinks
a super telephoto lens and only covers a very small field of view
allows you to zoom in and isolate your subject, like a flying bird
in order to get a shallow depth you should zoom in closer to your subject, to get a larger depth of field, zoom out
SUMMARY:
For shallow depth of field: 
a) use a large aperture like f/2,
b) move closer to your subject,
c) zoom in and use a longer focal length.
For large depth of field: 
a) use a small aperture like f/16,
b) move further away from your subject,
c) zoom out and use a shorter focal length

sources: photoaxe.com